Unicorn

This cutie is highly popular, and little girls love it, however, it is very tedious to make and takes close to an hour to complete.

IMG_20170225_220329

Date Created: 2/25/17
Difficulty Level: Advanced
Time to Complete: 50 minutes
Pricing: $9.00
Materials Needed:
  • grosgrain
    • 7/8″ white
    • 5/8″ pink
    • 3/8″ various colors for the main and bangs, I chose:
      • neon pink
      • neon orange
      • ansi yellow
      • neon green
      • island blue
  • 1.75″ salon alligator clip
  • scissors
  • hot glue gun
  • lighter or flame
  • googly eyes
Measurements: (and what the pieces are for)
  • head: 2″ of 7/8″ white
  • ears: (2) 1″ of 7/8″ white
  • nose: 1″ of 5/8″ pink
  • neck: 2.5″ of 7/8″ white
  • hair: (1 of each color makes mane and bangs) 2.5″ of 3/8″
    • neon pink
    • neon orange
    • ansi yellow
    • neon green
    • island blue
  • horn: 3-4″ of 3/8″ ansi yellow (cut in half long ways, makes 2 horns)
  • (2) 7-8mm googly eyes
  • clip liner: 4.5″ of 3/8″ ansi yellow
Notes:
Sorry, no tutorial available yet for this one.  Please add a comment below if you’d like to request to see instructions on how to make this bow.


4th of July Over the Top Bow, “Star Spangled Cutie”

4th of July Over the Top Bow with “Star Spangled Cutie” removable/changeable bottle cap

Date Created: 7/2016
Difficulty Level: Advanced
Time to Complete: 30+ minutes
Pricing: $7.00
IMG_20170310_154815
Materials Needed:
  • 3/8″ ribbon
    • red with white dots
    • navy& white lollipop stripes
  • 7/8″ ribbon
    • turquoise
    • white
    • navy
    • red & white stripe
  • 50-60cm french clip
  • 1.75″ alligator clip
  • 1″ bottle cap image
  • 1″ epoxy dot
  • 1″ bottle cap
  • E6000 glue
  • scissors
  • needle and thread
  • hot glue gun
  • lighter or heat seal source
Measurements: (and what the pieces are for)
  • 16″ of 7/8″ turquoise for boutique bow
  • 5″ of 3/8″ red with white dots for center
  • 4.5″ of 3/8″ red with white dots for clip liner
  • 6″ of 3/8″ red with white dots for center wrap
  • (2) 9″ of 3/8″ red with white dots for top bow surround
  • (2) 9.5″ of 3/8″ white & navy lollipop stripes for bottom bow surround
  • Spikes (all 4″, but I think 4.5″ would have worked better on this bow)
    • (2) 7/8″ turquoise
    • (2) 7/8″ white
    • (2) 7/8″ navy
    • (1) 7/8″ red & white stripe
Note:
After making boutique bow, it measured 3″ from corner to corner. So to measure the spikes I added 1″ and cut them at 4″.  However, these spikes ended up a bit too short and didn’t stick out under the bow at all.  I would try measuring spikes to be 1.5″ longer than longest length of the boutique bow.
Instructions:
Sorry, no tutorial available yet for this one.  Please add a comment below if you’d like to request to see instructions on how to make this bow.

Pinwheels with Tails (7/8″ ribbon)

Pinwheels with tails, made with 7/8″ ribbon for 4th of July

Date Created: 6/30/16
Difficulty Level: Intermediate
Time to Complete:
Pricing: $3.00
Materials Needed:
  • 7/8″ ribbon
  • 1/4″ ribbon
  • 3/8″ ribbon
  • 1.75″ alligator clip
  • scissors
  • hot glue
  • lighter or flame
  • needle and thread
 
Measurements: (and what the pieces are for)
  • bow: 11″ of 7/8″ navy ribbon
  • center wrap: a few inches of 1/4″ navy ribbon
  • clip liner: 3/8″ navy ribbon
 
Instructions:
  • Wrap the 7/8″ ribbon around a 2″ template to form pinwheel shape with tails.
  • Run needle and thread through center line, 2 stitches per piece of ribbon.
  • Cinch, wrap tight, and tie off.
  • Wrap and glue on center wrap.
  • Glue to ribbon lined alligator clip.


Pinwheels with Tails (5/8″ ribbon) for 4th of July

Pinwheels with tails, made with 5/8″ ribbon for 4th of July

Date Created: 6/30/16
Difficulty Level: Intermediate
Time to Complete:
Pricing: $2.50
Materials Needed:
  • 5/8″ ribbon for bow
  • 1/4″ ribbon for center wrap
  • 3/8″ ribbon for clip liner
  • 1.75″ alligator clip
  • scissors
  • hot glue
  • lighter or flame
  • needle and thread
 
Measurements: (and what the pieces are for)
  • bow: 9.5″ of 5/8″ red ribbon
  • center wrap: a few inches of 1/4″ navy ribbon
  • clip liner: 3/8″ white with red stripes ribbon
 
Instructions:
  • Wrap the 5/8″ ribbon around a 1.75″ template to form pinwheel shape with tails.
  • Run needle and thread through center line, 2 stitches per piece of ribbon.
  • Cinch, wrap tight, and tie off.
  • Wrap and glue on center wrap.
  • Glue to ribbon lined alligator clip.

29351c68-4034-4a81-a984-190d719192b3.jpg

50c002dd-7159-4314-adf3-b29d51c68047378e2257-dac7-4bec-9928-54ca5af5932b

Pinwheel (5/8″ ribbon) Hair Bow for 4th of July

Date Created: 6/2016
Difficulty Level: Beginner
Time to Complete:
Pricing: $2.50
66b9b546-8a82-4af5-b35b-1ea5a220c4ec.jpg
Materials Needed:
  • 5/8″ grosgrain ribbon (blue with white stars)
  • 5/8″ grosgrain ribbon (red)
  • 3/8″ grosgrain ribbon (white)
  • small clip
 
Measurements: (and what the pieces are for)
  • top half of pinwheel: 4″ of 5/8″ grosgrain ribbon (blue with white stars)
  • bottom half of pinwheel: 4″ of 5/8″ grosgrain ribbon (red)
  • center wrap: 4″ of 3/8″ grosgrain ribbon (white)
 
Instructions:
  • Fold ribbon as if making a tuxedo bow, but add both ribbons to the needle and thread.  Cinch the thread, wrap and tie off, to make a pinwheel.

Love Bug Butterfly

Date Created: 3/2/17
Difficulty Level: Intermediate to Advanced
Time to Complete: 30 minutes
Pricing: $7.00
Etsy Photos 2 105.JPG
Materials Needed:
  • all 3/8″ grosgrain ribbon
  • choose 3 different colors for the wings of your butterfly
  • choose a color for the antennae
  • pom poms
  • alligator clip
  • hot glue
  • scissors
  • ruler or measuring tape
 
Measurements: (and what the pieces are for)
  • (4) 3″ for outer wings
  • (4) 2.5″ for middle wings
  • (4) 2″ for inner wings
  • (1) 4.5″ for clip liner
  • (1) 1″ cut into 2 for antennae
  • (3) large or (5) small pom poms for body
  • (1) 1.75″ alligator clip
 
Instructions:
  • Heat seal all pieces of ribbon.
  • There a are 4 pieces of each color, or 2 pairs.  1 pair is for each wing.  Glue each pair together with a dot of glue at the tips so they form a right angle.  Flip it around and do the same thing with the other ends so they form a rounded football shape.  Repeat for each pair of ribbons. You should have 6 pair, 2 of each color.
  • Next, 1 of the outer wings and 1 of the middle wings and glue the middle one on the back of the outer one, about halfway down from the point.  Do the same glueing the inner wings onto the middle wings.  Then we change our pattern.  Take the other tip of the inner wings and glue it just below the other inner wing that you just glued on.  Next glue on the middle wing and finally the other tip of the outer wing.
  • Repeat to make a second wing.
  • Bring the 2 wings together. I usually snip off the pointed tip, so the wings fit together better. Glue the tips together.
  • Glue the wings to the ribbon lined alligator clip.
  • Next, make the antennae and glue onto the clip.
  • Last, glue on the pom poms.

Etsy Photos 2 088

Pinwheel with 7/8″ Ribbon

Picture (7).jpg

Pinwheel with Tails (7/8″ hot pink)

  • 17″ of 7/8″ hot pink ribbon made into pinwheel with tails on 3″ template
  • When running threads through, only look at the front and don’t be concerned about the back of the ribbon.
  • Thread the needle through two stitches on each piece of ribbon up through the middle just like on a bow tie. That makes for a nice cinch.
  • Next did 7/8″ white 16″ long, perfect.

Pinwheel with No Tails (7/8″ periwinkle)

16″ of 7/8″ periwinkle on 2 3/4-3″ template


Pinwheel with Tails (7/8″ orchid)

  • 14.5″ of 7/8″ orchid ribbon on 2 3/4″ template
  • 40 mm ribbon lined french clip

Patriotic 3 Layer Shabby Flower

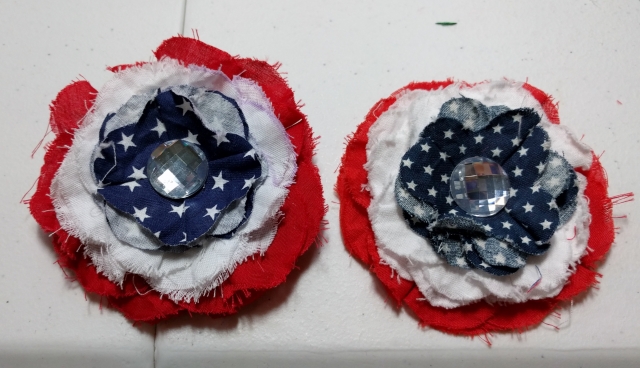
This shabby layered flower is perfect for any patriotic holiday.  It is also one of my most popular bows I sell on Etsy.  It’s one of the flowers though, that I absolutely LOVED the first time I made it, and now I’m having a hard time getting it to be exactly the same again because I never wrote down the measurements the first time, ugh. There are some comparison photos so you can see, I got it as close as possible.  Also I ran out of my favorite material, that was a gift from my aunt, and is probably 20 years old, because I can’t find exactly the same kind anywhere.  I bought 3 very expensive similar yards instead.
Date Created: Summer 2014
Difficulty Level: Beginner
Time to Complete: 20 minutes
Pricing: $5 +
 scrap-maniac-183
Materials Needed:
  • Red material
  • White material
  • Blue with stars
  • 18mm rhinestone
  • 2.25″ flat toothed alligator clip
  • Non slip grip
  • Felt
Measurements: (and what the pieces are for)
  • Red material: 4 flowers, 3.25″ diameter, 5 petals
  • White material: 4 flowers, 2.75″ diameter, 5 petals
  • Blue with stars: 4 flowers, 2″, 5 petals
  • Felt: 1.25″ circle
 
Instructions:
  • I cut out a strip of red material 3 5/8″ wide using the 3 5/8″ square template to fold it over. Then I traced the 3 1/2″ flower on, slid the template out and then cut out the flower.
  • First I roll all four colors in my hands to get them squished up a little bit. Then I roll one to time for a few seconds to get them a little shabbier. The longer you roll the shabbier they look.
  • Second layer, which is the white layer, I used the 2 3/4″ flower template.
  • When folding the bigger 2 layers of petals, hold two petals up to up to meet in the middle of one petal and then fold in together. However leave the side facing you slightly more towards the left so you have a flower petal bigger than 90 degrees. That will help close up any gaps.
  • For the blue with white stars later, I used the 2″template. Try to make these petals exactly 90° when folded since they are the top layer. Since they are smaller, petals they’re much easier to line up at 90 degrees.
  • Top with an 18 millimeter rhinestone, and choice of back mount.

img_20160610_213037

When comparing the old flower clip to the new flower clip, it appears that maybe the biggest layer was a bit smaller than 3 1/2″, maybe 3 1/4″ and the white layer may have been 2 1/2″. But the 2″ top layer looks appropriate.  New one on left, old one on right.Picture (10).jpg

Christmas Wreath Ribbon Sculpture Hair Clip

Date Created: 11/12/15
Difficulty Level: Intermediate
Time to Complete: 30 minutes
Price: $5 (only because once you get better at making the military braid, you can make them much more quickly)
winter-holidays-2014-029
winter-holidays-2014-038
Materials Needed:
  • 1/4″ green grosgrain ribbon
  • 3/8″ red grosgrain ribbon (or any color for bow on wreath)
  • 6mm red or colored jewels for embellishment
Measurements: (and what the pieces are for)
  • 40″ of 1/4″ green
  • 5″ of red for bow
  • 4.5″ of red for clip liner
Instructions:
  • I followed my purchased instructions for Turtle Ribbon Sculpture by Ella Bella Bows for military braid.
Notes:
Make on hair clip, magnet, pin or ornament for tree.
10/9/16: Tried again with the shiny 1/4″ satin and measurements were perfect. Also used 6mm lighter red jewels and 4 1/2″ of the red polka dot ribbon for both the clip liner and bow.
winter-holidays-2014-034

Turkey Ribbon Sculpture Hair Clip (2015 Version)

I first made ribbon sculpture turkeys in 2014.  The feathers were very large, so this year I scaled them back and bit and modified the placement of the feather.  I also changed the way I placed the beak and eyes on the face.  These little turkeys are so popular and you can have so much fun choosing different colors for the feathers!
Date Created: 2015
Difficulty Level: Advanced
Time to Complete: 30+ minutes
Pricing: $8.00 +
img_20151112_001444
Materials Needed:
  • 3/8′ ribbon in brown, red, orange and then various colors or prints for feathers
  • 1 3/4″ salon clip
  • (2) x 10mm googly eyes
  • scissors
  • hot glue
  • lighter
Measurements: See photo below of measured and cut pieces (and what the pieces are for)
Brown
  • 7″ for head and body, head folded up to mark at 3″
  • 3 1/2″ for first inner body loop
  • 2 1/2″ for second inner body loop
  • 3/4″ for back of head to close hole
  • 4 1/2″ for vertical clip liner
Orange
  • 3/4″ for beak, cut to triangle
Red
  • 1″ for gobbler (1 piece can make 2 gobblers cut wavy from corner to corner)
Polka Dot (various colors)
  • (5) 3 1/2″ for feathers
Turkey Hair Clip Tutorial.jpg
 
Instructional Video:
Optional:
2″ for tiny bow tie hair bow
3/4″ of 1/8″ ribbon to wrap over center thread of bow, or accent with a rhinestone