My Favorite Christmas Tree (12 Branches)

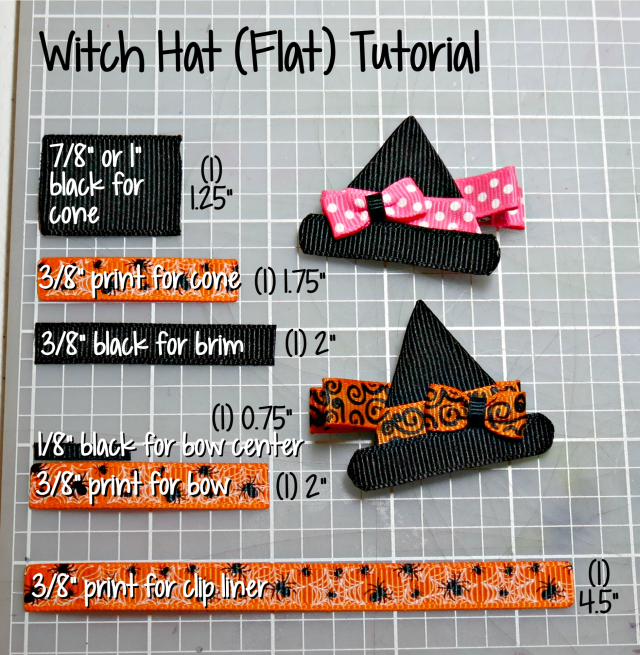
Date Created: 12/2/16 (after several times of making these)
Difficulty Level: Intermediate
Time to Complete: 30 minutes
IMG_20161202_234113.jpg
Materials Needed:
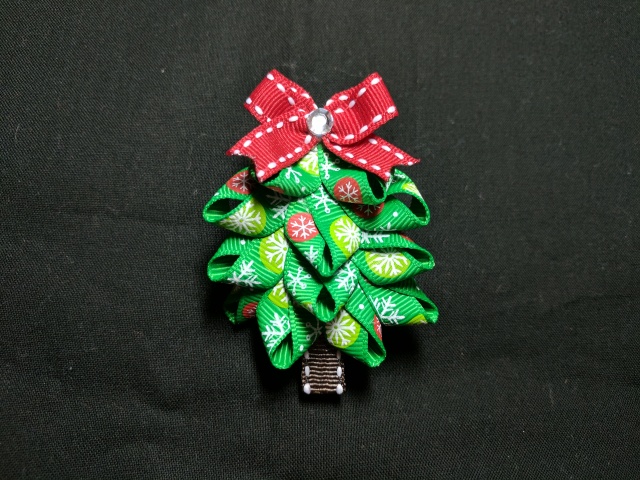
3/8″ grosgrain ribbon
     Tree branches: emerald green, green print with ornaments or green print with snowflakes
     Bow: red, white, pink, silver, gold, any color (saddle stitch, polka dot, pattern print, sheer glittery)
     Trunk clip liner: brown or brown with polka dots
Jem or rhinestone optional
needle and thread for bow
hot glue
salon clip, badge holder, magnet, pin…whatever you are going to mount it on
Measurements: (and what the pieces are for)
(12) 2″ for tree branches
(1) 4.5-5″ for bow
(1) 4.5″ for trunk clip liner
 
Instructions:
  • Heat seal ends of all ribbons
  • For each branch, place a dot of glue on top of one end, place the other end on top at an angle to create a teardrop shape, leaving a small hole in the center. Repeat for all 12 branches
  • Mount 4 branches together. Mount 3 branches together.  Mount 3 branches together again. Mount 2 branches together.
  • Line clip with ribbon for tree trunk.
  • Glue bottom wrung of 4 branches near the bottom of the clip. Next glue 3, then 3, then 2.
  • Make bow topper and glue on top of tree.  Embellish bow.
Notes:
  • Tree can be emerald or any other green (but no one purchased the dark evergreen color) and everyone LOVED when I made it with the light green that had an ornament Christmas pattern with a red with white saddle stitch bow. I personally liked it better with the white with red saddle stitch bow.
  • Keep hole in loop small
  • Don’t angle bottom row in too much, keep in more level
  • Really Spread the 3 out
  • Glue each row together first, then glue the row to the clip.  The top most row will run out of clip and just be glued to the previous row.
  • If making it on a badge pull, simply fold the clip liner in half and glue turner for more stability. Charging $7 for badge pull tree, probably $6 or $6.50 on a clip

More examples:

IMG_20161202_233916.jpg


Witch Hat 3D Ribbon Sculpture Hair Clip

Date Created: 10/6/2014
Difficulty Level: Intermediate
Time to Complete: 30 minutes?
Pricing: $5+ depending on materials and embellishments
2014-09-09 Fall Sculptures (26) pm 2
Materials Needed:
  • 2 1/4″ black ribbon
  • 1/4″ black ribbon
  • 3/8″ Halloween ribbon
  • cardboard or plastic to create templates
  • template to trace for hat circle and cone
  • light colored pencil for marking black ribbon
  • needle and black thread
  • 1 3/4″ single prong salon clip aka alligator clip
  • non-slip grip like Silly Grip
  • hot glue gun
  • lighter
  • protective heat mat
 
Measurements: (and what the pieces are for)
  • 2 1/4″ of 2 1/4″ black ribbon for round hat bottom
  • 3″ of 2 1/4″ black ribbon for hat cone
  • 5″ of 3/8″ Halloween ribbon for bow, cut edges into V shape
  • 3/4″ of 1/4″ black ribbon for bow center wrap
  • 3 1/2″ of 3/8″ Halloween ribbon for hat wrap, cut edges at 30% slant up
  • 4 1/2″ of  3/8″ Halloween ribbon for alligator clip liner
 
Instructions:
  • These are very general instructions, so I hope to be posting a video with more detail as soon as I can.
  • Trace templates for circle and cone onto the pieces of 2 1/4″ black ribbon using a white chalk pencil or light colored pencil so you can see where to cut it.
  • Cut out circle and cone, and heat seal all edges.
  • Wrap cone piece into cone shape and glue into place. (I’ll be making a video shortly showing how to do this, it is a little tricky.)
  • Use scissors if necessary to even out bottom of hat so it will sit flat on the circle, just make sure there are no bumps.
  • Starting in the back of the hat on the crease, glue the 3 1/2″ piece of Halloween ribbon to the hat with 1 dot.  It will still be sticking out on both sides.
  • 1 side at a time, add a little glue and adhere, wrapping it around to the front.  It will not all go on, it will slant down, and you will cut off the excess afterwards.
  • Cut off excess from wrap.
  • As evenly and quickly as possible, line glue around the entire circular bottom of hat cone and then center and stick onto hat circle before it dries.
  • Make bow, and glue onto center front of hat where points of hat wrap meet, thus covering that part up.
  • Finally, determine which way your hat will face and glue onto a ribbon lined alligator clip.

Witch Hat Ribbon Sculpture Hair Clip

Date Created: 2014
Difficulty Level: Beginner
Time to Complete: 20 minutes
Pricing: $5 +
spiders-and-hats-039p
Materials Needed:
  • 7/8″ black grosgrain ribbon
  • 3/8″ black grosgrain ribbon
  • 1/8″ black grosgrain ribbon
  • 3/8″ Halloween print grosgrain ribbon

Measurements: (and what the pieces are for)

witch-hat-flat-tutorial

  • Cone: 1 1/4″ of 7/8″ black ribbon
  • Hat belt: 1 3/4″of 3/8″ Halloween ribbon
  • Brim:  2″ of 3/8″ black ribbon
  • Bow wrap: 3/4″ of 1/8″ black ribbon
  • Mini BowTie : 2″ of 3/8″ Halloween ribbon
  • Clip Liner: 4 1/2″ of 3/8″ Halloween ribbon
Quick Instructions:
  • Fold 7/8″ ribbon into cone shape and glue folds in.
  • Glue hat belt onto cone with slight overlap.
  • Round ends of the black brim using lighter, then using slight overlap, glue onto hat belt.
  • Determine which way the hat will face, left or right and make bow tie and glue on.
  • Attach bow to ribbon lined clip.

Video Tutorial (sorry no sound):

Other Halloween ribbon patterns to consider.  Check EBAY for great prices on ribbon.

PicMonkey Collage hats1.jpg

BIG Pinwheels

This is an attempt to catalogue and list all the BIG pinwheels I have made lately.  I am always playing with the length of ribbon and sizing to see what I like best, so they are all just slightly different from each other.

Neon Pink & White

  • 22″ of 2 1/4″ white made into no tails pinwheel on 4 1/2″ template
  • 10″ of 2 1/4″ hot pink made into bow tie
  • wrap center with 3/8″ glitter white

img_20160916_231222

Hot Pink & Yellow

  • 20″ of 2 1/4″ hot pink made into no tails pinwheel on 4 1/4″ template
  • 8″ of 2 1/4″ yellow made into bow tie
  • ribbon lined french clip with 3/8″ hot pink
  • wrap center with 3/8″ hot pink
  • made to match hot pink & yellow animal print bikini

img_20160916_231320

Black

  • 22″ of 2 1/4″ black made into no tails pinwheel on 4 1/2″ template
  • used to clip watermelon ribbon sculpture onto it
  • (love this simple style to add to my own ponytails)

img_20160916_231408

Tiana Apple Green & Lilac Purple

  • 20″ of 2″ lilac purple made into no tails pinwheel on 4 1/4″ template (yes, not 2 1/4″)
  • 14 1/2″ of 7/8″ apple green made into no tails pinwheel on 3″ template
  • made to match a darker purple Tiana shirt

img_20160916_231518

Navy & Neon Pink

  • 20″ of 2 1/4″ navy made into no tails pinwheel on 4 1/4″ template
  • 8″ of 2 1/4″ neon pink made into bow tie
  • made to match “My sister is awesome” t-shirt

img_20160916_231150

Shocking Pink (unfinished)

  • 22″ of 2 1/4″ shocking pink made into no tails pinwheel on 4 1/2″ template

IMG_20160916_212730.jpg

 Big Red Pinwheel

  • 20″ of 2 1/4″ red on 4 1/4″ template
  • bow = 4 1/2″ wide
  • 9″ of 1 1/2″ white for bow tie on top, next time try 1/2″-1″ less than measurement of underneath bow or previous layer

I think this is the one I put a cute bottle cap on and Kaylin picked as her favorite bow


Popsicle Hair Clip

Popsicle Hair Clip for the 4th of July

I had been wanting to make these all summer long and then finally she put on this shirt and I just had to make a popsicle bow to go with it for her.

IMG_20160702_143653.jpg

So I made 1 to match the shirt and then made 2 other pops with the 4th of July inspiration

img_20160702_144248

img_20160702_161356


Here’s the measurements I used to make them.

  • 2″ of 1 1/2″ blue with white stars grosgrain
  • 4 1/2″ of 3/8″ red with white polka dots grosgrain for mini decorative bow
  • 1″ 0f 1/8″ white for bow center of mini decorative bow
  • 4 1/2″ of 3/8″ grosgrain for ribbon lined hair clip
  • 1/2″ of a  popsicle stick, score halfway with blade and then snap in half

img_20160702_143724

Here’s most of how I did it.  I left out details on repetitive bow making steps, but you can probably find tutorials on how to do those steps in my other blog posts.

  1. Cut rounded corners on blue with white stars ribbon. Cut the top corner a bit deeper in than on the bottom curves and then cut a “bite” shape into other top corner.  Use a lighter or candle as you seal it to adjust the shape of the “bite” to your liking.
  2. I cut felt for backing the popsicle to help hold it a bit more rigid so it wasn’t flopping around.  I got some very thin sturdier than normal, felt in a double sized sheet at the Hobby Lobby and that worked perfectly.  I cut it in about 1/4″ from all edges.  Adhere with hot glue.
  3. Line clip with a color similar to the popsicle stick, i used peach, it was the closest I had.
  4. Next, decide how long you want your stick to stick out the bottom and glue popsicle stick to pop.
  5. Be sure to line the clip (what I consider backwards) so that long flat side of the clip is fully lined with ribbon and bent side of clip is closer to the head.  Then glue ribbon lined clip to the back of the popsicle stick.
  6. Finally, make a mini decorative bow and add that to the front.  You don’t have to have that bow, but I think they look way cuter that way.

Wear the bow alone, or clip onto another bigger bow 🙂

img_20160703_152105

Pinwheels with Spikes and Mustache Bottle Cap

Stacked pinwheels with no tails and a layer of spikes with bottle cap with a mustache

IMG_20160610_220557.jpg

Pinwheel, 2 stacked no tail pinwheels on spikes with mustache bottle cap

  • 12″ of 7/8″ RABOM aqua to make pinwheel with no tails on 2 3/4″ template
  • 16″ of 1 1/2″ hot pink to make pinwheel with no tails on 3 1/2″ template
  • (2) 5 1/4″ of 1 1/2″ black for spikes
  • Mounted on french clip

Pinwheel Practice and Sizing

Pinwheels: with tails, with no tails and bow tie with tails

I wanted to see how the pinwheels came out when I made them with or without tails and how big they would be and how they would look on the clips.  Here are a few variations with 5/8″ colored dots grosgrain ribbon.

img_20160610_220742

Pinwheel with tails on ribbon lined alligator clip

  • 9 1/2″ of 5/8″ colored dots ribbon for pinwheel with tails on 1 3/4″ template
  • 4 1/2″ of 3/8″ hot pink for ribbon lined clip
  • 1 1/2″ of 1/4″ hot pink for center
  • NOTE: I think I’d prefer this pinwheel with tails on a 2″ template instead
img_20160610_220800

Pinwheel with no tails on ribbon lined alligator clip

  • 9″ of 5/8″ colored dots ribbon for pinwheel with no tails on 1 3/4″ template
  • 4 1/2″ of 3/8″ fuchsia for ribbon lined clip
  • 1 1/2″ of 1/4″ fuchsia for center
img_20160610_220814

Bow tie with separate tails on ribbon lined alligator clip

  • 4″ for bow tie and 2″ for tails, sewn on separately
  • 4 1/2″ of 3/8″ royal blue for ribbon lined clip
  • 4″ of 3/8″ royal blue for center knot

Pinwheel with “Mommy Makes My Bows” Bottle Cap

Stacked no tail pinwheels with spikes and bottle cap


  • 12″ of 7/8″ black to make no tails pinwheel on 2 3/4″ template
  • 16″ of 1 1/2″ white to make no tails pinwheel on 3 1/2″ template
  • (2) 5″ of 1 1/2″ shocking pink to make 2 spikes
  • Stack bows
  • 4-5″ of 3/8″ ribbon for center
  • Mounted on french clip
  • Top with bottle cap

Pinwheel with Tails and “My Mom Makes the Best Bows” Bottle Cap


I didn’t write down very specific notes on this one, so these are all the details that I have.

  • 1 1/2″ pink cheetah print grosgrain wrapped around 4″ template for a full pinwheel
  • white bottle cap with mounted saying and epoxy dot
  • 3/8″ black for center wrap
  • mounted on medium french clip

Pinwheel with Princess Castle Bottlecap

This is a double layer pinwheel with a bottle cap of a pink and purple princess castle.

  • 11 1/2″ of 7/8″ shocking pink made into no tails pinwheel on 2 1/2″ bow template
  • 16″ of 1 1/2″ light pink made into no tails pinwheel on 3 1/2″ bow template
  • stack bows, mount on medium french clip with 3/8″ shocking pink center wrap
  • embellish with Princess Castle bottle cap

img_20160622_091149