Ribbon Flower, 2 Layer Large, 4 inches wide

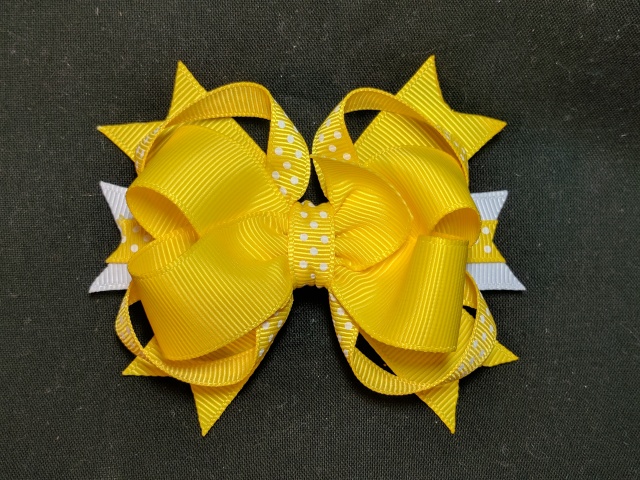
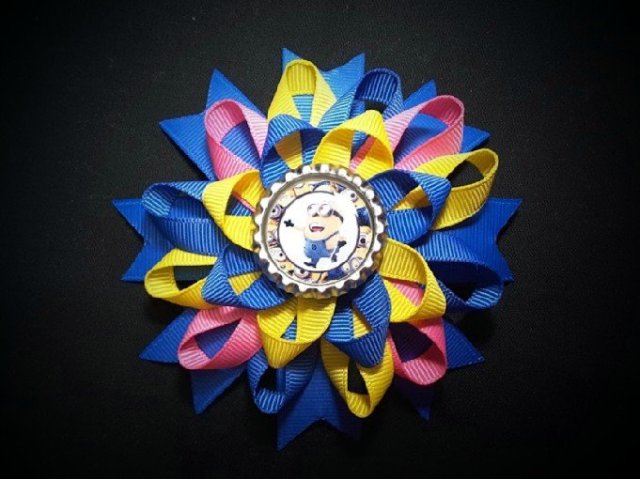
I made one of these for my niece for her 1st birthday party, as a Minion theme.

But I didn’t write down the measurements, so I’m just trying to recreate it, 2 years later with a Trolls theme. Here’s what I’m trying…

Top small flower bow: (2) 6″ of 3/8″ ribbon in 2 colors, I chose fuchsia and hot pink.

Bottom bigger flower bow: (2) 8″ of 3/8″ ribbon in 3 colors, I chose white, mint green and turquoise.

Spikes: (2) 4″ of 7/8″ ribbon in 2 colors, I chose turquoise and fuchsia. V cut ends.

Seal ends of all ribbon with a lighter before beginning. Find center and layer ribbons on the center of a pin. Glue centers so they won’t shift. Add each petal by pushing onto pin, then gluing as well.

After making the new flowers, each layer came out just a bit smaller than the ones on this minion bow, at 2.5″ wide. I think that the top layer of ribbon was more likely 7″. The 2nd bow came out to 3.5″ wide whereas the Minion one was closer to 4″ so it was probably 10″ ribbons. And the spikes were probably 4.5″ or 5″.

Minnie Mouse Boutique, Satin Print

Date Created: 2/26/17
Difficulty Level: Beginner
Time to Complete: 15 minutes or less
Pricing: $3.50
IMG_20170226_142535.jpg
Materials Needed:
  • ribbon: 22″ of 1.5″ Minnie Mouse satin print ribbon
  • clip: 50-60mm french clip
  • scissors
  • hot glue gun
  • lighter or flame
  • needle and thread
Measurements: (and what the pieces are for)
  • bow: 22″ of 1.5″ Minnie Mouse satin print ribbon
  • center wrap: 1/4″ pink satin
  • clip liner: 1/4″ pink satin
Notes:
Sorry, no tutorial available yet for this one.  Please add a comment below if you’d like to request to see instructions on how to make this bow.

Unicorn

This cutie is highly popular, and little girls love it, however, it is very tedious to make and takes close to an hour to complete.

IMG_20170225_220329

Date Created: 2/25/17
Difficulty Level: Advanced
Time to Complete: 50 minutes
Pricing: $9.00
Materials Needed:
  • grosgrain
    • 7/8″ white
    • 5/8″ pink
    • 3/8″ various colors for the main and bangs, I chose:
      • neon pink
      • neon orange
      • ansi yellow
      • neon green
      • island blue
  • 1.75″ salon alligator clip
  • scissors
  • hot glue gun
  • lighter or flame
  • googly eyes
Measurements: (and what the pieces are for)
  • head: 2″ of 7/8″ white
  • ears: (2) 1″ of 7/8″ white
  • nose: 1″ of 5/8″ pink
  • neck: 2.5″ of 7/8″ white
  • hair: (1 of each color makes mane and bangs) 2.5″ of 3/8″
    • neon pink
    • neon orange
    • ansi yellow
    • neon green
    • island blue
  • horn: 3-4″ of 3/8″ ansi yellow (cut in half long ways, makes 2 horns)
  • (2) 7-8mm googly eyes
  • clip liner: 4.5″ of 3/8″ ansi yellow
Notes:
Sorry, no tutorial available yet for this one.  Please add a comment below if you’d like to request to see instructions on how to make this bow.


Strawberry Ribbon Sculpture Hair Clip

Strawberry Ribbon Sculpture Hair Clip

Date Created: 10/2016
Difficulty Level: Beginner
Time to Complete: 15 minutes
Pricing: $3
 IMG_20160923_001144
Materials Needed:
  • grosgrain
    • 5/8″ red with white polka dots
    • 3/8″ emerald green
  • 1.75″ salon alligator clip
  • scissors
  • hot glue gun
  • lighter or flame
  • needle and thread
Measurements: (and what the pieces are for)
  • strawberry: 2.5″ of 5/8″ red with white polka dots
  • leaves: 1.75-2″ of 3/8″ emerald green
  • stem: 1.5″ of 3/8″ emerald green
  • clip liner: 4.5″ of 3/8″ (whichever color you like, white, green…)
Notes:
I like to clip a small bow like this onto a bigger bow, or even glue it directly onto a bigger bow.  If you mount the strawberry on a alligator clip, it can be work in the hair like that, or you can clip it onto a bigger bow.
Sorry, no tutorial available yet for this one.  Please add a comment below if you’d like to request to see instructions on how to make this bow.

Boutique (1.5″ ribbon), Small

This boutique bow is made from 1.5″ wide grosgrain ribbon and is about as small as a boutique can be with this width ribbon.

Date Created: 9/2016
Difficulty Level: Intermediate
Time to Complete: 10 minutes
Pricing: $3.00
IMG_20160929_182344
Materials Needed:
  • grosgrain
    • 1.5″ orange
  • clip
    • 50-60mm french clip OR
    • 1.75″ salon alligator clip
  • scissors
  • hot glue gun
  • lighter or flame
  • needle and thread
Measurements: (and what the pieces are for)
  • bow: 18″ of 1.5″ orange
  • center wrap: approx 6″ of 3/8″ orange
  • clip liner: 3″ of 3/8″ orange for 60mm french clip
 
Notes:
Sorry, no tutorial available yet for this one.  Please add a comment below if you’d like to request to see instructions on how to make this bow.

Yellow Over the Top Bow

Yellow & White Over-the-Top-Bow

Date Created:  9/21/16
Difficulty Level: Advanced
Time to Complete: 30+ minutes
Pricing: $4.00
 IMG_20170314_220050
Materials Needed:
  • grosgrain ribbon
    • 7/8″ yellow
    • 3/8″ yellow with white polka dots
    • 7/8″ white
  • clip
    • 50-60cm french clip
  • scissors
  • lighter or flame
  • needle and thread
  • hot glue gun
Measurements: (and what the pieces are for)
  • Boutique Bow
    • 16″ of 7/8″ yellow, hand folded with tails
  • Surround Bow
    • (2) 9″ of 3/8″ yellow with white polka dots
  • Spikes
    • (2) 4.5″ of 7/8″ yellow
    • (1) 5″ of 7/8″ white
    • (1) 5″ of 3/8″ yellow with white polka dots
  • French Clip Liner
    • 3″ of 3/8″ yellow with white polka dots
  • Center Wrap
    • 6″ of 3/8″ yellow with white polka dots
Notes:
Sorry, no tutorial available yet for this one.  Please add a comment below if you’d like to request to see instructions on how to make this bow.

Sand Bucket

Date Created: August 2016
Difficulty Level: Intermediate
Time to Complete: 15 minutes
Pricing: $4.00
IMG_20170314_131343.jpg
Materials Needed:
  • grosgrain ribbon
    • 3/8″ sand (tan)
    • 3/8″ watermelon
    • 7/8″ aqua
    • 1/8″ white
  • 1.75″ salon alligator clip
  • scissors
  • hot glue gun
  • lighter or heat seal source
  • needle and thread
 
Measurements: (and what the pieces are for)
  • 7.5″ of 3/8″ sand (tan) for sand
  • 2.5″ of 7/8″ aqua for bucket (trapezoid cut)
  • 2″ (or less) of 3/8″ watermelon for shovel
  • 2″ of 1/8″ white for bucket handle
  • 4.5″ of 3/8″ sand (tan) for clip liner
 
Notes:
Sorry, no tutorial available yet for this one.  Please add a comment below if you’d like to request to see instructions on how to make this bow.
IMG_20170314_131143IMG_20170314_131159

Stacked Bow (Aqua & Orchid)

Date Created: July 2016
Difficulty Level: Intermediate
Time to Complete: 30+ minutes
Pricing: $4
Materials Needed:
  • grosgrain ribbon
    • 7/8″ aqua
    • 7/8″ orchid
    • 3/8″ orchid
    • 3/8″ light orchid
    • 3/8″ aqua
  • clip
    • 50-60mm french clip
  • scissors
  • needle and thread
  • hot glue gun
  • lighter or heat seal source
 
Measurements: (and what the pieces are for)
  • Top Mini Boutique
    • 10″ of 3/8″ orchid
  • Boutique Bow
    • 14.5″ of 7/8″ aqua
  • Surround Bow, Top
    • (2) 8″ of 3/8″ light orchid
  •  Spikes
    • (2) 4.5″ of 7/8″ orchid
  • French Clip Liner
    • 3″ of 3/8″ orchid
  • Center Wrap
    • 6″ of 3/8″ aqua
 
Instructions:
Please see my other tutorials for how to make each part of this bow.
Notes:
Sorry, no tutorial available yet for this one.  Please add a comment below if you’d like to request to see instructions on how to make this particular bow.

4th of July Over the Top Bow, “Star Spangled Cutie”

4th of July Over the Top Bow with “Star Spangled Cutie” removable/changeable bottle cap

Date Created: 7/2016
Difficulty Level: Advanced
Time to Complete: 30+ minutes
Pricing: $7.00
IMG_20170310_154815
Materials Needed:
  • 3/8″ ribbon
    • red with white dots
    • navy& white lollipop stripes
  • 7/8″ ribbon
    • turquoise
    • white
    • navy
    • red & white stripe
  • 50-60cm french clip
  • 1.75″ alligator clip
  • 1″ bottle cap image
  • 1″ epoxy dot
  • 1″ bottle cap
  • E6000 glue
  • scissors
  • needle and thread
  • hot glue gun
  • lighter or heat seal source
Measurements: (and what the pieces are for)
  • 16″ of 7/8″ turquoise for boutique bow
  • 5″ of 3/8″ red with white dots for center
  • 4.5″ of 3/8″ red with white dots for clip liner
  • 6″ of 3/8″ red with white dots for center wrap
  • (2) 9″ of 3/8″ red with white dots for top bow surround
  • (2) 9.5″ of 3/8″ white & navy lollipop stripes for bottom bow surround
  • Spikes (all 4″, but I think 4.5″ would have worked better on this bow)
    • (2) 7/8″ turquoise
    • (2) 7/8″ white
    • (2) 7/8″ navy
    • (1) 7/8″ red & white stripe
Note:
After making boutique bow, it measured 3″ from corner to corner. So to measure the spikes I added 1″ and cut them at 4″.  However, these spikes ended up a bit too short and didn’t stick out under the bow at all.  I would try measuring spikes to be 1.5″ longer than longest length of the boutique bow.
Instructions:
Sorry, no tutorial available yet for this one.  Please add a comment below if you’d like to request to see instructions on how to make this bow.

Tattered Layers Badge Pull for St. Luke’s School of Nursing

Date Created: 7/16/2016
Difficulty Level: Beginner
Time to Complete: 20 minutes?
Pricing: $5+

Materials Needed:

  • White material
  • Navy material
  • 1″ bottle cap image of St. Luke’s
  • 1″ epoxy dot
  • 1″ flattened bottlecap
  • E6000 glue
  • Hot glue gun
  • Badge pull

Measurements: (and what the pieces are for)

  • (4) 2 1/8″ navy flower circles, tattered
  • (4) 2 3/4″ white flower circles, tattered

Instructions:

  • Cut material into flower petal shapes using a template or free cut rounded edges, approx 5 petal bumps on each.
  • Roll material between palms to tatter and great edges.
  • Open petals and fold in half, then quarter.
  • Place glue on inside of quartered petal, but not too close to what will be the middle.
  • Repeat for each petal. 
  • Snip corner of each petal.
  • Overlap and glue petals together, slightly overlapping previous one. 
  • Glue blue layer of petals on top of white layer of petals. 
  • Using a 1″ hole cutter, cut out the photo. 
  • Place epoxy dot on top of photo.
  • Use E6000 glue to adhere the photo to the bottlecap. (It will stay tacky until well after you finish the bow in case you need to adjust centering of the photo on the bottlecap. )
  • Glue 1″ felt circle on back of flower. 
  • Glue 1″ felt circle to back of bottle cap.
  • Glue bottle cap to bow.
  • Glue bow to badge pull.