4th of July Over the Top Bow, “Star Spangled Cutie”

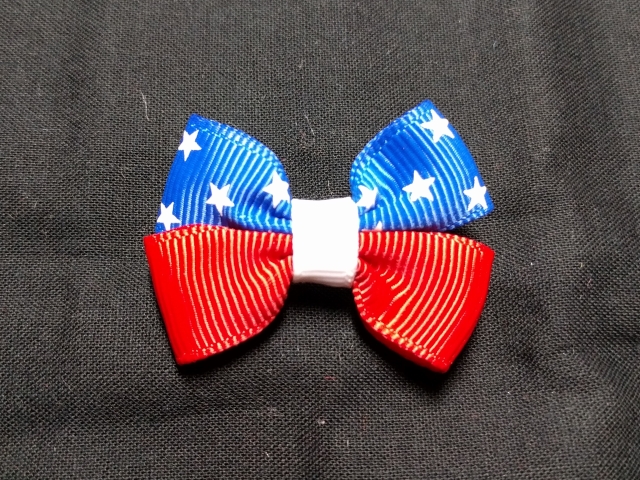
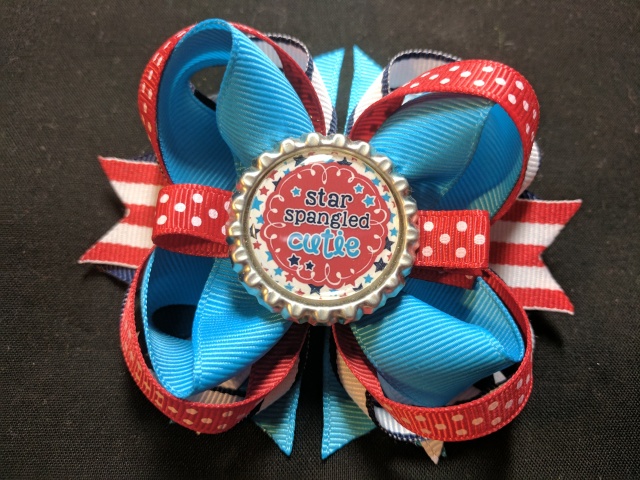
4th of July Over the Top Bow with “Star Spangled Cutie” removable/changeable bottle cap

Date Created: 7/2016
Difficulty Level: Advanced
Time to Complete: 30+ minutes
Pricing: $7.00
IMG_20170310_154815
Materials Needed:
  • 3/8″ ribbon
    • red with white dots
    • navy& white lollipop stripes
  • 7/8″ ribbon
    • turquoise
    • white
    • navy
    • red & white stripe
  • 50-60cm french clip
  • 1.75″ alligator clip
  • 1″ bottle cap image
  • 1″ epoxy dot
  • 1″ bottle cap
  • E6000 glue
  • scissors
  • needle and thread
  • hot glue gun
  • lighter or heat seal source
Measurements: (and what the pieces are for)
  • 16″ of 7/8″ turquoise for boutique bow
  • 5″ of 3/8″ red with white dots for center
  • 4.5″ of 3/8″ red with white dots for clip liner
  • 6″ of 3/8″ red with white dots for center wrap
  • (2) 9″ of 3/8″ red with white dots for top bow surround
  • (2) 9.5″ of 3/8″ white & navy lollipop stripes for bottom bow surround
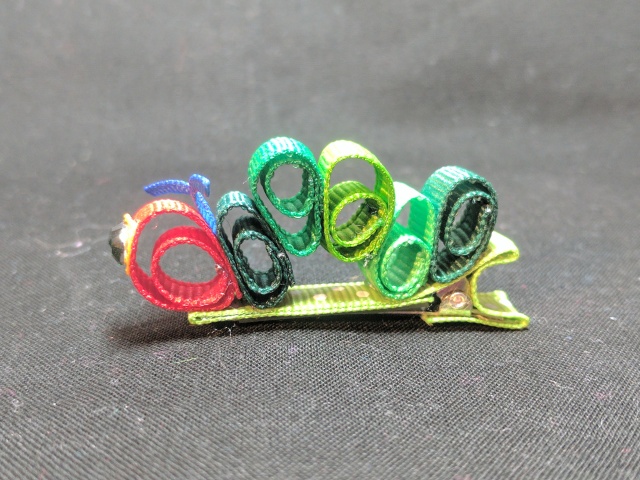
  • Spikes (all 4″, but I think 4.5″ would have worked better on this bow)
    • (2) 7/8″ turquoise
    • (2) 7/8″ white
    • (2) 7/8″ navy
    • (1) 7/8″ red & white stripe
Note:
After making boutique bow, it measured 3″ from corner to corner. So to measure the spikes I added 1″ and cut them at 4″.  However, these spikes ended up a bit too short and didn’t stick out under the bow at all.  I would try measuring spikes to be 1.5″ longer than longest length of the boutique bow.
Instructions:
Sorry, no tutorial available yet for this one.  Please add a comment below if you’d like to request to see instructions on how to make this bow.

Pinwheels with Tails (5/8″ ribbon) for 4th of July

Pinwheels with tails, made with 5/8″ ribbon for 4th of July

Date Created: 6/30/16
Difficulty Level: Intermediate
Time to Complete:
Pricing: $2.50
Materials Needed:
  • 5/8″ ribbon for bow
  • 1/4″ ribbon for center wrap
  • 3/8″ ribbon for clip liner
  • 1.75″ alligator clip
  • scissors
  • hot glue
  • lighter or flame
  • needle and thread
 
Measurements: (and what the pieces are for)
  • bow: 9.5″ of 5/8″ red ribbon
  • center wrap: a few inches of 1/4″ navy ribbon
  • clip liner: 3/8″ white with red stripes ribbon
 
Instructions:
  • Wrap the 5/8″ ribbon around a 1.75″ template to form pinwheel shape with tails.
  • Run needle and thread through center line, 2 stitches per piece of ribbon.
  • Cinch, wrap tight, and tie off.
  • Wrap and glue on center wrap.
  • Glue to ribbon lined alligator clip.

29351c68-4034-4a81-a984-190d719192b3.jpg

50c002dd-7159-4314-adf3-b29d51c68047378e2257-dac7-4bec-9928-54ca5af5932b

Pinwheel (5/8″ ribbon) Hair Bow for 4th of July

Date Created: 6/2016
Difficulty Level: Beginner
Time to Complete:
Pricing: $2.50
66b9b546-8a82-4af5-b35b-1ea5a220c4ec.jpg
Materials Needed:
  • 5/8″ grosgrain ribbon (blue with white stars)
  • 5/8″ grosgrain ribbon (red)
  • 3/8″ grosgrain ribbon (white)
  • small clip
 
Measurements: (and what the pieces are for)
  • top half of pinwheel: 4″ of 5/8″ grosgrain ribbon (blue with white stars)
  • bottom half of pinwheel: 4″ of 5/8″ grosgrain ribbon (red)
  • center wrap: 4″ of 3/8″ grosgrain ribbon (white)
 
Instructions:
  • Fold ribbon as if making a tuxedo bow, but add both ribbons to the needle and thread.  Cinch the thread, wrap and tie off, to make a pinwheel.

Snail Ribbon Sculpture

Date Created: 5/13/16
Difficulty LevelAdvanced
picture-6
Materials Needed:
ALL 3/8″ grosgrain ribbon:
  • Outside 10″
  • Inside 7″
  • Clip liner 4.5″
  • Body 4″
  • Antennae 1″

Notes:

  • For a 5 loop snail shell, begin inside and end outside with same color, usually the darker color. Have at least 3 inches extra of that color.
  • To start, glue top of outside piece facing down or inside against the other piece.

Bumble Bee Ribbon Sculpture Tutorial by Scrap Maniac

Date Created: 8/10/15
Difficulty Level: Intermediate
Time to Complete: approx 30 minutes
Pricing at: $5.00
Materials Needed:
3/8″ black with white saddle stitch ribbon
3/8″ yellow with white polka dot ribbon
1/8″ silver ribbon
1 3/4″ flat alligator clip
small rhinestone gem (4-6mm)
 
Measurements: (and what the pieces are for)
black with white saddle stitch
     (1) 2.5″ for 1st body loop
     (1) 3.5″ for 3rd body loop
     (1) 1″ for head
     (1) 1.5″ to make 2 antennae
     (1) 4.5″ for clip liner
yellow with white polka dots
     (1) 3″ for 2nd body loop
     (1) 4″ for 4th body loop
(1) 4″ of silver for wings
Bumble Bee Ribbon Sculpture Tutorial 2.jpg
Instructional Video:

Fish Ribbon Sculpture Hair Clip Tutorial

Welcome to my tutorial on how to make these adorable little goldfish hair bows.

Date Created: 9/20/2015
Difficulty Level: Intermediate
Time to Complete: 15 minute
Pricing: $3+
img_20150920_232828

Materials:

  • 5/8″ grosgrain
  • 3/8″ grosgrain
  • 1.75″ toothed alligator clip
  • (1) 7mm googly eye
  • scissors
  • needle and thread
  • hot glue gun

Measurements:fish-supplies-006

  • Body: 5-6″ of 5/8″ grosgrain
  • Fins and body center wrap: 1″ of 3/8″ grosgrain

Quick Instructions:

  • See video below for fully detailed instructions
  • Cut v shaped ends on 5/8″ ribbon.  Fold it in awareness style, taking notice that the loop at the top will be the mouth and use needle and thread to tie off center.  It looks like I liked measurement markings at 1.5″ and 5.5″ for center, so most likely 6″ of ribbon was used.  Mount on clip with glue.
  • Cut edge off of the 3/8″ ribbon to use a skinny approx 1/8″ wide or less piece for center belly wrap. Seal edge, then glue wrap around center, securing under big open part of clip.
  • Cut remaining piece of 3/8″ ribbon in half lengthwise at a diagonal to make 2 fins.  Glue under top and bottom of body.
  • Apply googly eye.


Instructional Video Tutorial:


Notes to Self on different renditions of making this fish:

  • #1) 5″ and 1″ – not long enough
  • #2) 6″ and 1.5″ – 6″ too long
  • #3) 5.5″ and 1.5″
  • mark 1.5″

IMG_20150920_232810.jpg

Cherries Ribbon Sculpture Hair Clip Tutorial

Date Created: 5/13/16
Difficulty Level: Beginner
Time to Complete: 10 minutes each
 picture-8
Materials Needed:
  • 3/8″ grosgrain ribbon in red, and red with white polka dots
  • 1/4″ grosgrain ribbon in green
  • 1 3/4″ alligator clip
  • hot glue
  • scissors
  • lighter or other ribbon sealing device
Measurements: (and what the pieces are for)
  •  (2) 1.5″ of 3/8″ red ribbon for inside of cherries
  • (2) 1.75″ of 3/8″ red ribbon for outside of cherries
  • 5.5″ of 1/4″ green ribbon for stems
  • small jewel approx 5mm
  • 4.5″ of red with white polka dots for clip liner
 
Instructions:
Sorry, no tutorial available yet for this one.  Please add a comment below if you’d like to request to see instructions on how to make this bow.

Butterfly Ribbon Sculpture Hair Bow

I LOVE getting outfits for my nieces for their birthdays or holidays, and making hair bows to match. It is so fun to customize the kind of bow I think they would like and then matching the colors and styles.  I usually end up with my most creative bows that way, because I’m not afraid to mix and match colors, since I know they obviously will look nice together since they look good on the outfit. The best compliment is then seeing them wear the outfit and matching bows 🙂

Butterfly

img_20160507_130808

3 Layer Butterfly ribbon sculpture hair clip bow

img_20160507_130837

The outfit the butterfly was made to match

All ribbons are 3/8″ grosgrain

  • Outer wings: 8″ and 6″ of hot pink
  • Middle wings: 7″ and 5″ of yellow
  • Inner wings: 6″ and 4″ of apricot
  • Antennae: 1″ of aqua to make 2
  • Head roll: 2.25″ of aqua – Holding ribbon with alligator clip about one eighth of an inch sticking out of the end, place a dab of glue on that one eighth of an inch and wrap the ribbon around the clip and then secured onto the glue, making a small circle. Wrap around one more time and secured with a dot of glue on the back of the same spot, making a head with two loops.
  • Body: 1.25-1.5″ – Fold one end of the ribbon in half and slice a backwards V to make a smaller neck portion. Measure about a half to three-quarters of an inch flat body and then glue the bottom together lengthwise to create a tail. I think it looks better with the tinier body that doesn’t overlap the end of the clip. Keep body more like three quarters of an inch so that it is long enough for the head and antennae to go above the wings.
  • Clip liner: 4.5″ of aqua
  • Jewel: approx 5mm jewel for body embellishment

Frog Ribbon Sculpture Tutorial

Date Created: 8/25/2015
Difficulty Level: Advanced
Time to Complete: 30 minutes
Pricing: $8+
Scrap Maniac Frog Ribbon Sculpture

Frog Ribbon Sculpture Hair Bow, with Turquoise Blue bow and clip by Scrap Maniac

Materials Needed:
  • 3/8″ green grosgrain ribbon
  • 3/8″ black grosgrain ribbon
  • 1/4″ pink grosgrain ribbon
  • 3/8″ color print of choice (polka dot or other pattern)
  • (2) 10 mm googly eyes
  • (1) 1 3/4″ metal single or double prong clip, or other mount like a badge pull, magnet or pin
  • needle and thread (preferable matching bow color) for tying bow
  • lighter or your choice of source of heat to heat seal all ribbons
  • hot glue gun
  • optional: hair clip grip like Silly Grip
Cute Frog Ribbon Sculpture Tutorial with Logo.jpg
Measurements:

3/8″ green grosgrain ribbon:

  • 3 1/2″ for head
  • (2) 1 3/4″ for arms (use pinking shears on 1 edge of each piece)
  • 2″ for body loop
  • 3″ for body loop
  • 4″ for body loop
  • 6″ for legs
  • 2 1/2″ for feet (use pinking shears on each end)

3/8″ black grosgrain ribbon (or 1/4″ or 1/8″):

  • 1″ for smile (cut lengthwise)

1/4″ pink grosgrain ribbon:

  • 1″ for tongue

3/8″ color print of choice (polka dot or other pattern):

  • 4 1/2″ for clip liner
  • 5″ for bow

STEPS

Video Tutorials:

Frog Ribbon Sculpture Tutorial – Part 1


Frog Ribbon Sculpture Tutorial – Part 2

The Very Hungry Caterpillar Ribbon Sculpture

Date Created: 8/11/15
Difficulty Level: Advanced
Time to Complete: more than 30 minutes
IMG_20170310_164605.jpg
Materials Needed:
  • 3/8″ grosgrain ribbon, various shades of green
  • 3/8″ blue grosgrain ribbon
  • 1/4″ yellow grosgrain ribbon (or any size, just to cut out eyes)
  • (2) approx 4mm wide tiny green gems
 
Measurements: (and what the pieces are for)
  • (4-5) 2.5″ pieces of green grosgrain ribbons for body loops
  • (1) 2.5″ (possibly bigger) green for head
  • (1) 4.5″ green for clip liner
  • (1) 1″ blue ribbon to make 2 antennae
  • (2) tiny 1/4″ yellow oval rounded shapes for eyes
Notes:

I cut lots of pieces and placed in a bag as supplies to make more caterpillars, but I only made 1.

IMG_20170310_164628.jpg

Sorry, no tutorial available yet for this bow.  Please add a comment below if you’d like to request to see instructions on how to make this bow.